Just drag and drop a file (or files) onto cdview3.exe icon.
cdview3 can also be executed by a command-line.
Type "cdview3 [FILENAME(s)]"
Enter the file name of coordinate data file into [FILENAME(s)].
This command also accepts wild cards.
By using mouse, cdview can change viewing angle or viewpoint, and select particle.
| Left Click + Drag | Rotate angle |
| Right Click + Drag | Move forward and backward |
| Left & Right Click + Drag | Move parallel to screen |
| CTRL+Left Drag | Tilt angle |
| Point Particle + Left Click | Select particle |
Keyboard shortcuts and commands are available. Type '/' to access Command Mode.
All available shortcuts/commands are shown in The Details of Operation.
The following three formats are acceptable for data file.
The recommended file extension is "cdv". Any file extension is acceptable, except "fdv" and/or "pdb".
Basically, provide each particle information per line. Format is:
[serial number] [particle type] [x] [y] [z]
The followings are examples of Data File.
0 0 379.434700 344.410400 391.625700
1 0 363.349400 396.798000 354.886200
2 0 363.111300 382.512500 408.103700
3 0 363.352600 344.300500 360.257600
Particle colors are defined based on the particle type. The default setting for colors:
  0:red 1:green 2:blue 3:cyan 4:magenta 5:yellow
6:dark green 7:gray 8:white 9:hide (non-display)
For more details, please see: cdview Format Details
File extension is "fdv".
This is the format for displaying scalar quantity on 3D lattice in contour line or surface. In the beginning of the file, number of lattices should be written as follows:
' fv_xn=[number of x lattice] fv_yn=[number of y lattice] fv_zn=[number of z lattice]
Data Format looks like:
[x-lattice] [y-lattice] [z-lattice] [x] [y] [z] [scalar quantity]
Lattice coordinate should be smaller integer value than the number of lattice. Coordinates and Scalar quantities should be real-valued.
The followings are examples of Data File
' fv_xn=27 fv_yn=27 fv_zn=27
0 0 0  -67.426294 -67.426294 -66.649452  3.593000
0 0 1  -67.426294 -67.426294 -61.470506  2.258000
0 0 2  -67.426294 -67.426294 -56.291561  1.573000
0 0 3  -67.426294 -67.426294 -51.112615  0.768000
0 0 4  -67.426294 -67.426294 -45.933669 -0.395000
  ...
For more details, please see: fdview Format Details
Regarding displaying fdview file, Cursor Up/Down Shift cross-section, Cursor Right/Left Change displayed contour surface
File extension is "pdb".
pdb format is used exclusively for showing protein structure. The followings are examples of Data File.
ATOM      1  N   LYS     1      41.863  28.070  11.605  1.00  0.00
ATOM      2  H1  LYS     1      41.406  28.282  12.480  1.00  0.00
ATOM      3  H2  LYS     1      42.854  28.243  11.702  1.00  0.00
ATOM      4  H3  LYS     1      41.708  27.076  11.510  1.00  0.00
ATOM      5  CA  LYS     1      41.314  28.960  10.570  1.00  0.00
ATOM      6  HA  LYS     1      40.242  28.776  10.629  1.00  0.00
ATOM      7  CB  LYS     1      41.562  30.453  10.774  1.00  0.00
ATOM      8  HB2 LYS     1      42.494  30.795  10.323  1.00  0.00
  ...
For more details, please see:Worldwide Protein Data Bank
As to PDB file, type 'e' to select protein display mode, 'w' to select water display mode.
The keyboard shortcuts are available. The followings are operative examples:
cdview can display particle motion easily and make movies of them since it was made for showing the simulation results of molecular dynamics etc.
To use the Simple Animation Function, prepare sequentially-numbered particle coordinate files (or PDBs) like "pos001.cdv, pos002.cdv,pos003.cdv ..." and go through the following procedure.
File switching speed increases by loading all the data into memory. The procedure is as follows.
When there are too many files, it is recommended to set interval wider in order to save memory.
When the Simple Animation Function is active, follow the procedure below to output image files for making movies.
From output image files, you can make movies by using FFmpeg or other applications.
alt+'s' (or alt+'a') give sequential file number which begins 1. (For FFmpeg)
When FFmpeg command is set in an environment variable CDVIEW_MAKE_MOVIE_COMMAND, the command is automatically performed after alt+'s' or alt+'a' key. FFmpeg should be installed in a path which is set in the PATH environment variable. FFmpeg command should be included special words %IN% and %OUT%. The former is replaced with the input file name and the latter is replaced with the output file name which not include the file extension. The followings are command examples.
| Command | Format |
|---|---|
| ffmpeg -y -r 15 -i %IN% -vcodec libx264 -pix_fmt yuv420p %OUT%.mp4 | frame-rate:15, file format:mp4 |
| fmpeg -y -r 15 -i %IN% -b 2000k -vcodec wmv2 %OUT%.wmv | frame-rate:15, bit-rate:200kbps, file format:wmv |
When CDVIEW_REMOVE_BMP_AFTER_MAKING_MOVIE is set 1, bmp files for the making movie are removed automatically.
When command line option -auto [keys] is set, [keys] are automatically inputed. If you set -auto DDDvvs+q, 'D' is inputed 3 times, 'v' is inputed 2 times, alt+'s' is inputed, and 'q' is inputed to finish cdview3. Then, you can make many movie files, if you make a batch file.
Type 'l' to show particle labels. When displayed particles are few, it is easy to find particles with specific labels.
When displayed particles are many, follow the procedure below.
Type again 'j' to cancel particle focusing, 'g' to display all particles.
To change particle position, follow the procedure below.
When the particle with bond are moved, combined particles are also moved together without changing bond-length. This is useful for editing PDB files. Refer to Add/Delete bond for more information on making bonds.
To add/delete bond, follow the procedure below.
When there are missing residues, you can complement them by adding the residue to missing part. The procedure is as follows.
The above is the way to add Residue in C-direction (ascending order). To add Residue in N-direction (descending order), type command 'add_rp'.
| Left Click | Show details of clicked particle "SHIFT-Click" is acceptable to select multiple items. |
| Left Drag | Rotate angle |
| Right Drag (Up and Down) | Move forward and backward |
| Left & Right Click + Drag | Move parallel to screen |
| CTRL + Left Drag (Rotate) | Tilt angle (rotate vertically to screen) |
| Key | Function |
|---|---|
| ESC | Quit |
| SPC | Change atom type column (for "cdview" files) |
| - | Show/Hide of all the atom types (for "cdview" files) |
| / | Use Command Mode |
| 0 | Show all atom types |
| 1-9 | Show/Hide particles (type: 0 - 8) (from 10 to 18, use +alt) |
| = | Show/Hide particles (type : 9, as to 19, use +alt) |
| > | Move selected residue in ascending order (for "pdb" files) |
| < | Move selected residue in descending order (for "pdb" files) |
| ? | Cancel to move particles |
| a | Go to the first file |
| A | Move file sequentially in descending order with outputting bmp (for making movie) |
| b | Change to Perspective/Orthographic projection |
| c | Move file in ascending order |
| C | Move file in descending order |
| d | Decrease particle details |
| D | Increase particle details |
| e | Change Drawing Mode in ascending order (for "pdb" files) |
| E | Change Drawing Mode in descending order (for "pdb" files) |
| f | Search particle(s) |
| F | Search residue(s) (for "pdb" files) |
| g | Change display mode of selected atom |
| h | Show/Hide additional surface data |
| H | Make additional surface data translucent |
| i | Change Color Mode in ascending order (for "pdb" files) |
| I | Change Color Mode in descending order (for "pdb" files) |
| j | Focus on selected particle |
| J | Show/Hide axis index |
| k | Change Cell's Display Mode in ascending order |
| K | Change Cell's Display Mode in descending order |
| l | Change Label Display Mode in ascending order |
| L | Change Label Display Mode in descending order |
| m | Particle Move Mode |
| n | Change particle name (for "pdb" files) |
| o | Output file |
| O | Output BMP file |
| q | Quit |
| r | Decrease particle size |
| R | Increase particle size |
| s | Go to last file |
| S | Move file sequentially in ascending order with outputting bmp (for making movie) |
| t | Translate selected 2 particles in the same position |
| u | Show/Hide isosurface |
| U | Change isosurface draw mode |
| v | Change text display level in ascending order |
| V | Change text display level in descending order |
| w | Change water display mode in ascending order (for "pdb" files) |
| W | Change water display mode in descending order (for "pdb" files) |
| x | Stop sequentially file changing |
| y | Fit/Don't Fit to reference file (for "pdb" files) |
| Y | Show/Hide reference file |
| z | Move file in descending order |
| Z | Move file sequentially in descending order |
| [ | Change Background Color (White/Black) |
| DEL | Delete Selected Particle(s) |
| F1 | Show Keyboard Operation Help |
| F2 | Show Command Help |
| Command | Short Command | Function |
|---|---|---|
| calc rmsd | rmsd | Calculate RMSD (for pdb files) |
| calc rmsf | rmsf | Calculate RMSF (for pdb files) |
| calc distance | dis | Calculate time-dependent distance between 2 particles |
| del distance | ddis | Delete distance calculation window |
| store memory | mem | Load memory of multiple files |
| set skip | skip | Set skip numbers of file moving |
| set time_unit | tu | Set time unit [fs/ps/ns] |
| show line | line | Display particles bond line |
| hide line | line_off | Hide bond line |
| show particle | particle | Display particle |
| hide particle | particle_off | Hide particle |
| calc solvent_exclude_surface | ses | Calculate solvent exclude surface (SES) |
| calc solvent_exclude_surface_all | ses_all | Calculate SES all flames |
| add text | text | Show arbitrary text |
| find particle_label | label | Search Particles |
| output bmp | bmp | Output BMP file in 'O' |
| output pov | pov | Output POV file in 'O'(shadow off) |
| output pov_shadow | pov_shadow | Output POV file in 'O'(shadow on) |
| calc density | den | Density calculation |
| fit axis [x|y|z] | fita [x|y|z] | Fit selected 2 particles to axis |
| add residue next | add_rn | Add residue in descending order |
| add residue prev | add_rp | Add residue in ascending order |
| change residue | cr | Change residue name (side chain is deleted) |
| change atom | change_a | Change atom name (for pdb files) |
| make bond | make_b | Add bond between selected 2 particles |
| remove bond | rm_b | Delete bond between selected 2 particles |
| change level_max | lmax | Change max level of isosurface |
| change level_min | lmin | Change min level of isosurface |
| gr particle | gr | Calculate radial distribution function |
| gr monomer | gr mono | Calculate monomer radial distribution function |
| adjust depth | depth | Adjust display depth |
| output prep | prep | Output prep file |
| move dummy | mv_d | Move dummy particles in prep file |
| change show_selected_particle_range | change s_range | Set range around selected particle |
| set clip_plane | clip | Set clip plane( x??, y?? or z?? ) |
| add clip_plane | add_clip | Add clip plane( x??, y?? or z?? ) |
| rotate | rot | Coordinate Rotation: rot [x|y|z] angle (cNum): Num is chain number |
| translate | trans | Move Coordinate: trans [x|y|z] length (cNum): Num is chain number |
| set c_color | c_color | Set number of continuous color columns: num
[min] [max] num: number of columns follow on coordinate (Max:4) min,max: Minimum/Maximum of color value |
| set eye_angle | eye_angle | Set eye angle (default 30 deg.) |
| rotate molecule | rot_mol | Rotate selected molecule (for PDB file) |
The followings are examples of Data File
0 0 379.434700 344.410400 391.625700 0 0 0 2
1 0 363.349400 396.798000 354.886200 0 0 0 0
2 0 363.111300 382.512500 408.103700 0 0 0 3
3 0 363.352600 344.300500 360.257600 1 9 9 9
4 0 372.181800 401.394000 350.105200 0 0 0 0
5 0 406.834800 394.561500 374.777800 2 0 9 9
Format is:
[serial number] [particle type 0] [x] [y] [z] [particle type 1] [particle type 2] ...
Particle type should be integer number, and colors are specified by the integer numbers.
Maximum number of particle type column is 6. Those can be switched by space-key.
When the particle type column of particle is just 1, the format is:
[serial number] [particle type] [x] [y] [z]
Lines locate in the beginning of files and start with ' or # are identified as comments.
The followings are available commands in comment lines.
| box_sx=[num] | x of the start point of the simulation cell box |
| box_sy=[num] | y of the start point of the simulation cell box |
| box_sz=[num] | z of the start point of the simulation cell box |
| box_ex=[num] | x of the end point of the simulation cell box |
| box_ey=[num] | y of the end point of the simulation cell box |
| box_ez=[num] | z of the end point of the simulation cell box |
| box_wt=[num] | Thickness of the simulation cell box |
| box_c=([num1],[num2],[num3]) | Specify the color of the simulation cell box. num1 for red, num2 for green, num3 for blue When the background is white, specify colors in box_c2. |
| r?=[num] | Put integer value into "?" to specify the radius of the particle type "?" |
| c?=([num1],[num2],[num3]) | Put integer value into "?" to specify the color of particle type "?". num1 for red, num2 for green, num3 for blue |
| bond_file=[file_name] | Specify the name of file with bond information. |
| bond?_c=([num1],[num2],[num3]) | Put integer value into "?" to specify the color of bonds. num1 for red, num2 for green, num3 for blue |
| bond?_wt=[num] | Put integer value into "?" to specify the thickness of bonds. |
| face_file=[file_name] | Specify the name of file with face display information |
| face?_c=([num1],[num2],[num3]) | Put integer value into "?" to specify the color of face. num1 for red, num2 for green, num3 for blue |
| st?=[str] | Put integer value into "?". Type in strings of adequate characters into [str]. |
| st?_pos=([num1],[num2]) | Display position of strings of characters (recommended range: from -2.5 to 2.5) |
| light_position=([num1],[num2],[num3]) | Specify the light-source direction. Default: (1.2,1.0,1.1) |
| c_color=[num] | Set number of columns to change color of particles continuously. |
| c_color_start=([num1],[num2],[num3]) | The start color of continuous color changing. |
| c_color_end=([num1],[num2],[num3]) | The end color of continuous color changing. |
The default setting for colors:
0:red 1:green 2:blue 3:cyan 4:magenta 5:yellow 6:dark green 7:gray 8:white 9:hide (non-display) 11-99:gray
You can draw bond between any particles by specifying bond file with command in comment line. (for cdview file)
In the bond file, two serial numbers of particles and bond type should be provided. When the bond type is omitted, it is treated as bond type "0".
You can also display bond between particles by writing bond information with same format in cdv or pdb file. In this case, use "CDVIEW_BOND" in the beginning of line. (Use "REMARK CDVIEW_BOND" for pdb file.)
You can draw a triangle among any 3 particles by specifying face file with command in comment line. (for cdview file)
In the face file, three serial numbers of particles and face type should be provided. When the face type is omitted, it is treated as face type "0".
You can also display face between particles by writing face information with same format in cdv file. In this case, use "CDVIEW_FACE" in the beginning of line.
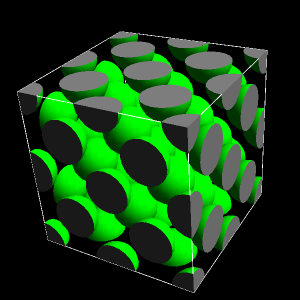
When you set particle's radius as r0=(1.0,2.0,3.0), you can display spheroids with each of their radius is x-axis:1.0, y-axis:2.0, z-axis:3.0
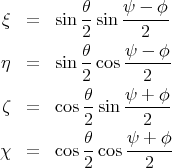
Particle angle can be set by entering quaternion  next to the x, y, z-coordinates.
The relation between quaternion and Euler angle is given by the following equations.
next to the x, y, z-coordinates.
The relation between quaternion and Euler angle is given by the following equations.
You can set start-up options when start from command line.
| -level_num | Number of isosurfaces (for fdview) |
| -level_max | Maximum value of isosurfaces (for fdview) |
| -level_min | Minimum value of isosurfaces (for fdview) |
| -detail | Default value of details for polygon (default 6) |
| -c [file_name] | [file_name]:Information file of header |
| -eye_pos | Set default viewpoint |
| -rot_pos | Set center of rotation |
| -w[num] | [num]:Window width (default 448) |
| -h[num] | [num]:Window height (default 448) |
| -x[num] | [num]:X of the window (default 50) |
| -y[num] | [num]:Y of the window (default 0) |
| -ax[num] | [num]:View angle around the X axis of the rotation. (default 0) |
| -ay[num] | [num]:View angle around the Y axis of the rotation. (default 0) |
| -az[num] | [num]:View angle around the Z axis of the rotation. (default 0) |
| -j | Orthographic mode |
| -full | Full-Screen mode |
| -stereo | Stereo mode |
| -eye_angle | View angle (default 30) |
| -auto |
| CDVIEW_PARTICLE_SIZE_SCALE | The radius value of particle in cdview file. The default setting is 0.7 |
| CDVIEW_ENABLE_AXIS | Set 1 to display the axis index by default. |
| CDVIEW_LIGHT_POSITION_X | X in light-source direction |
| CDVIEW_LIGHT_POSITION_Y | Y in light-source direction |
| CDVIEW_LIGHT_POSITION_Z | Z in light-source direction |
| CDVIEW_DISABLE_ERROR_HIT_ENTER | Disable Hit Enter Key when an error message is showed |
| CDVIEW_MAKE_MOVIE_COMMAND | Command to make FFmpeg movie after alt+'s' and alt+'a' key |
| CDVIEW_REMOVE_BMP_AFTER_MAKING_MOVIE | Set 1 to remove bmp files for FFmpeg movie |
cdview317.zip (Windows)
An alternative binary in which you should use alt+left click to select
a particle is made, because the particle selection is very slow if your
graphic board dose not have hardware acceleration for the polygon
selection. Please use the following binary, if the particle selection is
very slow.
cdview317_alt_pick.zip (Windows)
Put the unzip file folder to someplace appropriately.
The program is written in OpenGL and glut. freeglut is used in ver. 3.15 or later. Any additional dlls are not required because of static link. glut32.dll is needed in ver. 3.15 or later.
Source code is in
http://sourceforge.net/projects/cdview/
Please change Makefile according to your environment.